Showing posts with label summer. Show all posts

Saturday, June 24, 2023

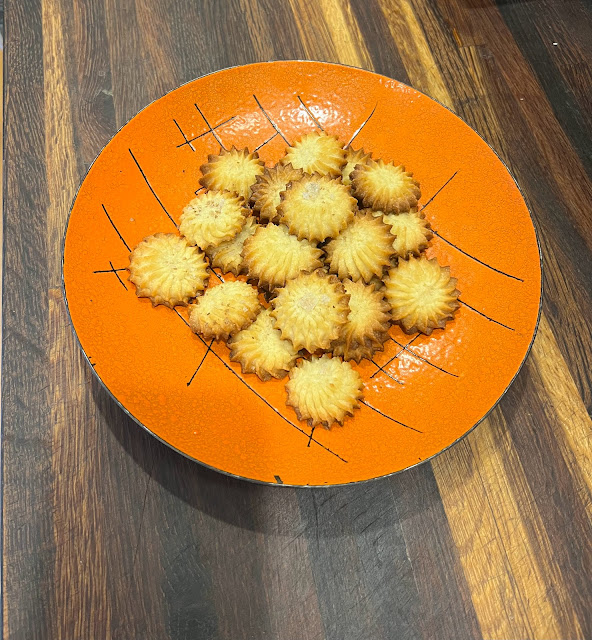
Applewood smoked salt butter cookies

Seasonal Recipe of the Week
It’s finally summer! And now my attention turns to my garden. This year things seem to be growing well—unlike last season's failure. Perhaps it’s due to my online soil research, or maybe it’s my new friendship with the neighbor up the street who is a biologist and a farmer. He tested my soil and recommended specific supplements and it worked! Nitrogen and potassium were low, but now everything is happy. In addition to gardening, I try and get out and try new things. I started bouncing on the rebounder (also known as a mini trampoline) daily. A friend recommended it, and it’s a really fun way to exercise! I started drinking a super green supplement and drinking mushroom tea. Perhaps I am losing my mind, maybe I am trying to maintain what’s left of my youth, but I feel great. What does this have to do with baking cookies? Nothing. Just wanted to update you! What's new with you?

So ... basic butter cookies. This is the cookie you make when you have nothing in the pantry. And then you remember how delish butter, sugar, and flour can be. I always keep extra butter in the freezer, always have eggs, sugar, flour, and vanilla. These cookies are delicious just as is. But with slight modifications, you can take this cookie in many different directions. My Pittsburgh friend gifted me some beautiful smoked salt, which was amazing! But you have so many options: sesame seeds; toasted coconut; almond extract and slivered almonds on top; chocolate drizzle after baking with a shaved chocolate garnish; finely diced fresh herbs (rosemary, thyme, basil, or dill) for a savory twist; or you can go old-school and stick an M&M in the center. Get creative!

Ingredients
1 cup (226g) unsalted butter, softened
2/3 cup (140g) granulated sugar
1/4 teaspoon salt
2 large, room temperature egg yolks
1 1/2 teaspoons vanilla extract
2 cups (283g) all-purpose flour (scoop and level to measure)
2 to 4 teaspoons milk
Sprinkling of smoked salt (mine was from the Spice & Tea Exchange in Pittsburgh)

Procedure
Preheat oven to 350 degrees. In the bowl of an electric stand mixer fitted with the paddle attachment, cream together butter, sugar, and salt until combined. Mix in egg yolks and vanilla. Add flour and mix until crumbly then add in 2 teaspoons of milk, if needed add in another 1 to 2 teaspoons more of the milk for a more pipe-able consistency - add as little as possible for less spreading, though. Transfer to a 16-inch piping bag fitted with a very large open star tip. Make stars or circles onto two ungreased baking sheets. Just to be clear, this might not be easy. The dough is thick. You can add extra water to make it easier to pipe, but the more liquid you add, the more the dough will spread. Sprinkle a few flakes of smoked salt on top of each cookie. Bake in preheated oven until golden brown on bottom, about 12 to 16 minutes. Let cool on baking sheet for 5 minutes then transfer to a wire rack to cool completely. Store in an airtight container, or just eat them all.

Tuesday, July 26, 2022

Sheet pan cooking: Gochujang Chicken, Za’atar Chicken, Roast Rhubarb Chicken

Three Seasonal Recipes of the Summer
Hello there! I'm not sure there is still anyone checking this, as I have been so negligent. But I am still cooking and making discoveries every day and I want to share them with you. Unfortunately, my busy schedule and my poor work habits have stopped me from updating since Thanksgiving, which is just wrong!

As some of you know, I have been a private chef to a great family with very specific dietary needs for the past two years and I have learned so much about alternative ingredients in cooking and baking. I love a challenge! So here are three recipes which started as recipes from the New York Times recipe website which I have modified and—I think—improved. I love the idea of throwing everything on a sheet pan, popping it into a hot oven, and—like magic—dinner is ready!

Great in theory, but the reality is different ingredients take different amounts of time. So you're better off staggering when you add each ingredient and have them all finish at the same time. That being said, once you have a good understanding of how things cook, you can get really creative. (BTW, I could not find my photos of these dishes so you get a pic of this weird tattooed bunny mannequin instead. I am full of sheet!)

Gochujang chicken

Ingredients
4 tablespoons gochujang (spicy Korean chili paste)
3 tablespoons soy sauce or coconut aminos
1 one-inch piece of fresh ginger, peeled and grated (about 1 tablespoon)
4 tablespoons neutral oil, like grapeseed or canola, plus more for drizzling
2 pounds squash, such as butternut, acorn, or delicata, unpeeled, seeded and cut into 2-inch pieces (about 5 loose cups)
1 pound turnips, trimmed and cut into 2-inch pieces (about 3 1/2 loose cups)
10 scallions, ends trimmed, green and white parts separated, but not chopped
Kosher salt
2 1/2 to 3 pounds bone-in, skin-on chicken thighs
1 bunch radishes (about 10 ounces), trimmed
2 tablespoons rice vinegar
1 tablespoon sesame oil (optional)

Procedure
Heat the oven to 425 degrees. Combine the gochujang, soy sauce, ginger and 3 tablespoons oil in a medium bowl or resealable bag. Add the squash, turnips and scallion whites, toss to coat with glaze, or seal bag and shake to coat. Lightly season with salt and transfer to an oiled rimmed baking sheet. Season the chicken with salt and toss to coat in whatever is left of the glaze in the bowl or bag. Arrange the chicken pieces skin-side up on another baking sheet. In the original recipe it was all on one sheet but I found the vegetables got soggy, followed by mushy, so I separated it.

Roast until vegetables are tender, chicken is cooked through and the skin crispy and browned in spots, about 40 minutes. Check your chicken and make sure it is done. Skin should get crispy and dark.

While the chicken cooks, thinly slice the scallion greens. Using a sharp knife or a mandoline, cut the radishes into thin rounds. In a small bowl, toss the sliced scallion greens and radishes with the rice vinegar and sesame oil, if using. Season to taste with salt and set aside to lightly pickle.

Top the roast chicken and vegetables with the quick-pickled scallion-radish mix and transfer to serving plates. Serve with steamed rice, if desired.

Za’atar chicken

Ingredients 6 garlic cloves, finely grated, pressed, or minced
2 lemons, zested
1 cup plain whole-milk yogurt
1/4 cup chopped fresh cilantro, plus more sprigs for garnish
4 tablespoons extra-virgin olive oil, plus more for serving
2 tablespoons za’atar, plus more for serving
1 tablespoon chopped fresh oregano or marjoram, plus more sprigs for garnish
1 3/4 teaspoons salt
1/4 teaspoon freshly ground black pepper
2 1/4 pounds boneless, skinless chicken thighs
1 pound tiny potatoes cut in half

Procedure In a large bowl or container, stir together 5 of the grated garlic cloves, half the lemon zest, 1/3 cup yogurt, the cilantro, oil, za’atar, oregano or marjoram, salt and black pepper. Add chicken and toss until well coated. Cover and refrigerate for at least 2 hours or overnight. Overnight is way better.

When ready to cook, heat your oven to 425. Remove chicken from bowl, shaking off any excess marinade, put on oiled sheet pan, along with the potatoes which have a drizzle of olive oil and salt on them. Cook for should take 25-30 minutes. Make sure to mix it a little and check that the potatoes are tender.

While the chicken is cooking, place remaining 2/3 cup yogurt in a small bowl. Stir in the reserve grated garlic clove and lemon zest, and season to taste with salt and pepper. Cut one zested lemon in half and set aside for serving (save the other zested lemon for another use). To serve, place chicken and potatoes on a serving platter and drizzle with olive oil and a large squeeze of the zested lemon. Top with cilantro and oregano or marjoram sprigs and serve with yogurt sauce.

Rhubarb Roasted chicken

Ingredients
1 3/4 pounds bone-in, skin-on chicken thighs
1 teaspoon ground coriander
1 teaspoon kosher salt
1/4 teaspoon freshly ground black pepper
1 large red onion, cut into 1/2-inch-thick wedges
5 thyme sprigs
3 tablespoons extra-virgin olive oil, plus more as needed
8 ounces rhubarb stalks, sliced into 1-inch pieces (about 2 cups)
3 tablespoons honey, plus more to taste
1/2 cup cilantro or mint leaves and tender stems

Procedure
Heat oven to 425 degrees and line sheet pan with parchment paper. Pat chicken dry with paper towels and season all over with coriander, 1 teaspoon salt and 1/4 teaspoon pepper.

Place onion wedges on the prepared sheet pan and lightly season with more salt and pepper. Add chicken and thyme sprigs to the pan and drizzle 3 tablespoons oil over everything. Toss until well coated, then spread chicken and onions in a single layer. Roast for 30 minutes.

While the chicken is in the oven, combine rhubarb and 3 tablespoons honey in a medium bowl. Lightly drizzle with oil, add a pinch of salt and pepper, and toss until rhubarb is well coated.

Remove chicken from oven and carefully spoon rhubarb onto the hot pan around the onions and chicken. Continue roasting until the chicken is cooked through, and the rhubarb and onion are tender and caramelized, 15 to 20 minutes longer, tossing the rhubarb and onions (not the chicken) once about halfway through.

Stir the rhubarb and onions very well, making sure to incorporate all the browned bits and chicken juices from the bottom of the pan (this is the tastiest part). Then sample a piece of rhubarb. If it’s very tart, drizzle with a little more honey, tossing well. Serve chicken with rhubarb-onion mixture garnished with herbs.
Monday, July 26, 2021

Corn Ribs are the Bomb!

Seasonal Recipe of the Week
Need a way to impress your loved ones? July is peak corn time around here, and this is a really cool way to prepare fresh corn. I learned this recipe during my time at Ottolenghi in London, but I never tried it before. It’s not difficult to do, but takes a sharp knife, a strong arm, and a willingness to deep fry.

You can flavor these in a variety of wild ways or keep them classic with butter and salt. I chose to do a Mexican-street-food thing and tossed the corn in a lime-chipotle aioli, grated Parmesan cheese and cilantro. You didn't know Parmesan was Mexican? Okay, okay, I took a little liberty. The most important thing is to be careful when cutting, and make sure to first cut a flat surface on each end so the cob stands straight. No ingredients listed becasue it’s all about the corn!


Procedure
Remove the husk and silk from the corn, rinse and dry. Cut a flat surface on each end so they stand tall and straight. With a sharp knife, cut through the center of the cob (I used a slight rocking motion to help the knife cut through the tough cob). Then place the flat side down on your cutting board and cut each half again so you now have corn cob quarters. That’s it, you’ve done the hard part!

Put a pot of oil on high heat, or turn on a deep fat fryer, and get your oil to 350 degrees. Fry about 6 pieces at a time for 3-4 minutes or until the corn lightly browns and curls. Don’t crowd them in the oil! Remove and drain briefly on a wire rack set over a baking sheet. While still hot, toss with flavorings.

Some flavoring ideas
Sauces: lime-chipotle aioli, hot sauce, lemon-garlic mayo, sauce verte.
Cheeses: Parmesan, feta, cotija, herbed goat.
Fresh herbs: parsley, cilantro, tarragon, dill.

Make sure to supply lots of napkins, these can be a bit messy, as it’s finger food. And please don’t eat the cobs!


Saturday, August 29, 2020

Almond Breakfast Bread (for folks with severe dietary limitations)

Seasonal Recipe of the Pandemic
I have a fantastic job cooking for a wonderful family and the Mom has quite a few restrictions on what she can eat, but loves food and trying new things. This keeps me on my toes and constantly experimenting. I am now working with a new palette of ingredients which include alternative sugars, dairy substitutes, no legumes, and gluten-free options. Learning how they interact and trying to make things taste good while staying within my new framework is a fun problem. Breads and baked sweets are particularly challenging. We have all had plenty of heavy, gummy or super dry and gritty desserts! This breakfast bread is a winner and I am currently working on variations which I will list at the bottom of the recipe.

Ingredients
3 eggs
3/4 cup almond butter
6 tablespoons agave syrup
1/2 cup non-dairy sour cream
3 drops Boyajian's orange oil
3 Tablespoons Earth first butter (non-soy)
1 Tablespoon Yuzu or lemon juice
1 teaspoon almond extract
1/4 teaspoon salt
1/2 teaspoon cinnamon
1/2 cup arrowroot
2 teaspoons baking powder

Procedure
Put everything but the arrowroot and baking powder in blender (I use a Vitamix) and blend 30 seconds. Then add dry ingredients and blend until smooth. Scrape down the sides with a spatula to make sure everything mixes. Bake at 350 degrees for 50 minutes in a spray-greased loaf pan. Test with a toothpick to see if it's done.

Notes
I use the Vitamix because I don't have a stand mixer at work, but a mixer would be great. I am now experimenting with other nut butters like hazelnut chocolate butter (Nutella basically, but with more body) tahini, peanut butter, and cashew butter. Extracts like coffee, maple, and mint are also a great way to alter the flavor. Boyajian oils are fun to play with because they add an intense pure shot of citrus without thinning the batter. You can also fold in nuts or fresh berries or dried fruit.

Tuesday, July 07, 2020

Grapefruit Campari Sorbet

Seasonal Recipe of the Pandemic
It's hot, it's humid, there are gross bugs crawling on me when I step outside, it's unsafe to go to the beach, or eat out, so basically all that's left to do is eat. I love making sorbets with the season's fresh fruits and any delicious combinations I can come up with. This one uses the great Italian aperitif Campari, plus pink grapefruit juice, how can you go wrong? It's so simple and so refreshing!


Ingredients
3 cups fresh squeezed pink grapefruit juice (about 6 grapefruits)
3/4 cup sugar
1/4 cup Campari

Procedure
Warm 1 cup of grapefruit juice with the sugar over low heat until the sugar dissolves. Then mix in the rest of the juice and the Campari. Chill mixture thoroughly then process in your ice cream machine if you have one. If you don't, freeze mixture in shallow tray till firm, then break it up with a knife, buzz up the chunks in a food processor, and refreeze.

Wednesday, September 04, 2019

Spanish Scallop Salad

Every year for my lovely sister-in-law's birthday I cook a feast for her and her family at their home on Long Beach Island. This summer I decided to make it a themed buffet of Spanish tapas! It gave me the opportunity to use authentic Spanish ingredients I bought at Despaña in Soho, as well as local island seafood, and produce from my garden. (I made about 12 different tapas for the party and plan to feature all of them in the coming months here on the blog. It was a huge success and we have already agreed on a middle eastern buffet for next summer.) I had planned to do some kind of marinated seafood salad, originally thinking of using Calamari, but when I got to our favorite local fish market and the sign said: "local scallops" I could not resist. Enjoy, and know you can use any kind of seafood you want for this dish.


Ingredients
1 1/2 lbs scallops, calamari(rinse, dry and cut into rings), or shrimp (peeled and deveined)
2 tablespoons fresh lime juice
1 tablespoon aged sherry vinegar
1/3 cup good olive oil
1 clove minced garlic
1/2 teaspoon salt
1/4 teaspoon black pepper
1 small red onion, cut in half, then into very thin slices
1/3 cup pitted Kalamata olives
2 cups grape tomatoes, cut in half
2 ribs of celery, finely sliced
1 cup loose packed flat leaf parsley, leaves only
1/4 cup cilantro leaves (optional)

Procedure
Clean the scallops and cut them in half if large and dry them (you cannot sauté them if they are wet). Sauté scallops in a little olive oil, lemon juice, salt, and pepper until the surface shows some small cracks, then remove from pan. If using shrimp or calamari, lightly poach them in some water, white wine, lemon juice, and herbs of your choice and then quickly cool them.

Whisk together the lime, vinegar, oil, garlic, salt, and pepper. Stir in onions and let sit 5 minutes. Meanwhile, combine the cooled seafood, olives, tomato, celery and parsley. Toss with dressing and refrigerate 1 hour before serving to allow flavors to combine. If you want extra heat, add some Aleppo pepper to the mix.

Monday, August 19, 2019

Grilled Pineapple Tofu Cheesecake — a vegan dessert for everyone!

Seasonal Recipe of the Week
I have been working on some great new recipes I want to share. There are some great natural substitutes on the market which enable me to do yummy baking for the vegans in our lives. In particular, egg substitutes, which make baking possible. I also love to use cashews soaked in water overnight to make an amazing cream, add a little sriracha and you have a killer pasta sauce — BAM! But I digress, back to baking. This recipe combines silken tofu, cashew cream, banana, coconut oil, and pineapple to make a super delicious pie, even your carnivore eaters will love. Gotta soak those cashews overnight, so plan ahead! Makes one 8-inch cake.

Ingredients for crust
1 1/4 cup finely ground graham cracker (or any vegan cookies)
3 tablespoons sugar
4 tablespoons melted coconut oil
2 tablespoons almond milk

Ingredients for filling
1/2 cup raw cashews, soaked in water overnight
1/2 cup mashed ripe banana
14 ounces silken tofu, drained
2 tablespoons coconut oil, room temperature
2/3 cups sugar
4 teaspoons cornstarch
1/4 teaspoon fine sea salt
4 tablespoons fresh pineapple juice
Grated zest of 1 lime

Grilled pineapple slices for garnish
2 tablespoons toasted coconut for garnish

Procedure
Preheat oven to 350° and lightly spray an 8-inch springform pan with nonstick cooking spray.

To make the cookie crust, place the cookies in your food processor and pulse until you get fine crumbs. In a medium mixing bowl, stir together the cookie crumbs and sugar. Drizzle in the melted coconut oil and mix well to ensure the crumbs are moist. Pour in the almond milk and stir again to combine all ingredients. You might need to use your hands to blend the mixture to get a crumbly dough. Pour the crust mixture into the springform pan and press very firmly into the sides of the pan first and pat into the bottom. Bake for 10 minutes until firm. Remove from oven and place and let the crust cool completely before filling.

To make the filling, drain the soaked cashews and tofu. Add the cashews, mashed banana, tofu, coconut oil, sugar, cornstarch, sea salt, pineapple juice and lime zest to a blender and whizz until completely smooth and there aren't any small bit of cashew. Pour the batter over the crust and tap it lightly on the counter to get rid of any large air bubbles. Bake the cheesecake about 50 minutes, until the edges are golden and the top is lightly puffed and still looks a bit wet. Cool cake completely before adding the topping.

To decorate, cut thin rounds of fresh pineapple, remove center rind with small ring cutter. Grill in a very hot dry pan to get blackened marks. Let cool, then place rings on top of cake. Sprinkle with toasted coconut. Refrigerate cake overnight for best results.

Sunday, September 04, 2016

A nature moment with Ask Rula!

Hello, my people! It seems I have been AWOL for a while, so sorry! I have moved to the country! Long Island counts as rural, right? Along with fixing up the new (old) Chez Rula, I have been gardening! Or well, rather, watching the gardeners. Those guys need someone to bring them spiked lemonade, and hold their shirts for them when they get all hot and sweaty! But no matter where I am, people always seem to have questions. And I have answers! So let's get to a few of them right now, shall we?

Our first question is from Green and Blue, and she says:
Dear Rula,
This year has been both good and bad for my tomatoes. My plants have set a LOT of tomatoes, but it's already getting too cool at night for them to ripen. I enjoyed the few ripe ones I got, but what can I do with all these green tomatoes — besides frying them?
I'm so sad.
Signed,
Green and Blue


Dear Green and Blue,
Pickle them! I slice and pickle green tomatoes all the time. They're great on sandwiches! I usually just wing it — a little dill, bay leaf, mustard seed, sugar, vinegar and a pinch of salt — but here's a simple refrigerator pickle recipe for you:

Basic Refrigerator Pickles

Ingredients - for every pound of vegetable
1 cup apple cider vinegar
1 cup water
1/2 cup sugar
1 Tablespoon kosher salt
Extras: fresh herbs, red pepper flakes, mustard seed, cumin seed, peppercorns, cloves of garlic, or any other pickling spices

Procedure
First, clean and prepare all your vegetables. If it's a veggie you normally eat raw, leave them alone. If not, you can blanch them in boiling water, steam them, or roast them. You want them edible but still a little crunchy — like me!

Next, pack all your vegetables tightly into jars — slice them up to fit. You can use old canning jars or any other heat-proof container with an airtight lid. You can also combine more than one type of veg in the same jar — but make sure the combination will taste good together because all the flavors mix it up in there.

In a small saucepan, bring all the brine ingredients to a boil, then remove from heat and pour the brine over the vegetables. Put the lids on the containers, cool them to room temp, and then refrigerate for at least 24 hours before eating, if you can wait. They'll keep for about a month in the fridge, assuming they last that long!


This next question is from Probiotic Patty, and she asks:
Dear Rula,
As a middle-aged, smart-and-savvy woman trying to compete with thousands of millennials for low-paying jobs in the big city, I need all the help I can get. One thing I have started to do is try to take better care of myself, which means I am paying more attention to what I eat. There are those who say food can empower you, so I figured what the hell! I am now really into probiotic foods. Wondering about making sauerkraut, I looked it up and it seems to have only one ingredient. I know nothing about cooking and have seldom used my kitchen, so I was thinking this would be my speed. Any thoughts?
Signed,
Probiotic Patty


Dear Probiotic Patty,
You know what they say, "A woman with guts needs a healthy gut," so you go girl! Yes sauerkraut is indeed simple to make and really good for you and delicious on a kosher dog. But let's talk about what probiotics are first, ok? Probiotics are live bacteria and yeasts that are good for your health, especially your digestive system. We usually think of bacteria as something that causes diseases. But your body is full of bacteria, both good and bad. Probiotics are often called "good" or "helpful" bacteria because they help keep your gut healthy. Here is a short list of best probiotic choices: yogurt; sauerkraut; miso soup; soft cheeses; kefir; sourdough bread; milk with probiotics; and sour pickles. But honestly honey, most of this is above your pay grade so let's start at the very beginning — how to turn cabbage into sauerkraut. This recipe makes 1 to 1 1/2 quarts and is very detailed, so pay attention!

Sauerkraut

Ingredients
1 medium-sized head of green cabbage (about 3 pounds)
1 1/2 tablespoons kosher salt
1 tablespoons caraway seeds (optional, for flavor)
1 big mason jar (like 2-quart size)
1 smaller jelly jar
rocks or marbles to use as weights

Procedure
Clean everything. When fermenting anything, it's best to give the good, beneficial bacteria every chance of succeeding by starting off with as clean an environment as possible. Make sure your mason jar and jelly jar are washed and rinsed of all soap residue. You'll be using your hands to massage the salt into the cabbage, so wash your hands as well.

Slice or shred the cabbage into thin threads. Combine the cabbage and salt and start massaging and squeezing the cabbage with your hands. At first it might not seem like enough salt, but gradually the cabbage will become watery and limp — more like coleslaw than raw cabbage. This will take 5 to 10 minutes. If you'd like to flavor your sauerkraut with caraway seeds, mix them in now. Then stop for a cocktail, darling.

Pack the cabbage into the jar with your hands, as tightly as possible. Place one of the larger outer leaves of the cabbage over the surface of the sliced cabbage. This will help keep the cabbage submerged in its liquid. Weigh the cabbage down — once all the cabbage is packed into the mason jar, slip the smaller jelly jar into the mouth of the jar and weigh it down with clean stones or marbles. This will help keep the cabbage weighed down, and eventually, submerged beneath its liquid.

Cover the mouth of the mason jar with a cloth and secure it with a rubber band or twine. This allows air to flow in and out of the jar, but prevents dust or insects from getting in. Press the cabbage every few hours — over the next 24 hours, press down on the cabbage every so often with the jelly jar. As the cabbage releases its liquid, it will become more limp and compact and the liquid will rise over the top of the cabbage. If extra liquid is needed, you can dissolve 1 teaspoon of salt in 1 cup of water and add enough to submerge the cabbage. Ferment the cabbage for 3 to 10 days — as it's fermenting, keep the sauerkraut away from direct sunlight and at a cool room temperature — ideally 65°F to 75°F. Check it daily and press it down if the cabbage is floating above the liquid. Taste it and when it seems sour enough refrigerate and eat. I love sauerkraut with rice, it's like Jewish kimchi.

If you have any questions for me, feel free to send me an email or leave a comment here on this post!

Well, that's all for now, my little sprouts — all that sod isn't going to lay itself! Ciao!

Sunday, August 28, 2016

Vegetable Galettes and Herbal Infusions


Seasonal Recipe of the Week
As my summer garden's harvest dwindles down to the stuff the rabbits and squirrels didn't think was good enough, it's time to access the usable bits and try to make them last through the winter. I have a few tomatoes, some eggplant, lemongrass, shiso, basil and lots of green herbs. So here is a recipe for a veggie galette, a whole wheat crust folded over a bed of vegetables cheese and fresh herbs — perfect vegetarian main dish with a salad. The other fun thing to do to save summer is infuse vinegars and make herbal simple syrup.

Vegetable Galette

Ingredients for whole wheat crust
1 cup all-purpose flour
1 cup whole wheat flour
1 teaspoon kosher salt
3/4 cup (1 1/2 sticks) chilled unsalted butter, cut into pieces
1 tablespoon apple cider vinegar
1/4 cup ice water

Procedure for crust
Pulse all-purpose flour, whole wheat flour, and salt in a food processor to combine. Add butter and pulse until mixture resembles coarse meal with a few pea-size pieces of butter remaining.
Dump mixture to a large bowl; drizzle with vinegar and ¼ cup ice water. Mix with a fork, adding more ice water by the tablespoonful if needed, just until a shaggy dough comes together; lightly knead until no dry spots remain (do not overwork). Form a disk and wrap in plastic. Chill at least 2 hours or overnight.

Ingredients for galette filling
1 cup cheese (Ricotta, Gruyere, Asiago, or whatever)
Kosher salt and freshly ground black pepper
3 tablespoons olive oil, divided
4 ounces sautéed mushrooms, thinly sliced (maitake, crimini, shitake, etc.)
1 garlic clove, finely chopped
1 bunch large Swiss chard, or spinach ribs and stems removed, leaves cut into bite-size pieces
1 large egg, beaten to blend to brush crust
1 cup mixed fresh tender herbs (such as flat-leaf parsley, cilantro, dill, and/or chives)
1 teaspoon finely grated lemon zest
1 teaspoon fresh lemon juice
Sea salt

Procedure for galette
Preheat oven to 400°. Shred up your cheese and set aside. SautĂ© your greens or vegetables and season with fresh herbs. Squeeze out extra liquid from greens, and set aside. Roll out dough on a lightly floured sheet of parchment to a 14” round about 1/8-inch thick. Transfer on parchment to a baking sheet. Brush crust with egg wash leaving a 2 inch border dry and sprinkle with Panko to help absorb extra moisture. Then layer in your ingredients. Bring edges of dough up and over filling, overlapping as needed, to create a 1 1/2-inch border; brush with egg and sprinkle with sea salt and fresh herbs. Bake galette, rotating once, until crust is golden brown and cooked through, 35 to 40 minutes. Let cool slightly on baking sheet. Serve warm or at room temperature.
 

Infused vinegars

To make flavored vinegars, start with good quality organic apple cider vinegar and some clean glass bottles with tops. Stuff bottles with an assortment of herbs then fill with vinegar. I made four bottles of Salad Burnett infused vinegar (which tastes like celery) and one bottle of lemongrass vinegar using the long beautiful leaves. You just need to store it in a dark, cool place for 3 weeks, shaking it up occasionally. Then you can remove herbs or leave them in place.

Herbal simple syrups

As you all know, a simple syrup is made of equal parts of sugar and water boiled for 3 to 5 minutes until it is clear. Then you remove the syrup from the heat, add the herb and let it sit in syrup 30 minutes, strain out, and refrigerate. Great with seltzer, or in a cocktail. Some of my favorites syrups are bay leaf, rosemary, lemon verbena, tarragon (great in limeade).

Saturday, July 06, 2013

Guests Bram and Monica Meehan: Summer Grilling

Excellent Ingredient Equipment of the Week
A note from Stacy: This week, the excellent ingredient is actually a piece of equipment — your grill. Its good for so much more then just hot dogs. Monica and Bram have all kinds of creative ideas for your grill and if all else fails check out Mark Bittman's 101 Fast Recipes for Grilling.

Charcoal? Propane? Whichever suits you and your style of cooking. The important thing is to use that grill in the hot summer months by trying out all kinds of meats, seafood, vegetables, and fruits. We'll often just look around at what we've got and what's fresh and on sale and then, as Stacy noted, let Bittman tell us what to do with it.

Salmon Grilled Between Romaine Lettuce Leaves

This old standby comes from Bob Blumer, who gives us a delicious way to grill fish without having to worry about it sticking to the grate. Monica will usually make an artichoke heart-lemon-chive-olive oil tapenade that gets wrapped with the salmon, the remainder passed at the table. The other day we substituted Swiss Chard for the lettuce, and grilled up rest of the stems and leaves quickly beforehand for a wilted salad.

Ingredients
four 3-foot pieces of twine, or other non-flammable natural fiber
four 6 oz. salmon fillets or steaks — fillets are easier to eat, steaks are easier to wrap and cook
eight large outer romaine lettuce leaves
2 teaspoons olive oil
three lemons — two juiced, one sliced thinly
salt and freshly ground black pepper

Procedure
Soak twine in hot water for 5 minutes. Rinse salmon in cold water and pat dry with towel. Repeat the following for each piece of salmon: rinse two romaine leaves in water, shake off excess water. Drizzle 1/2 teaspoon of oil over the inside (concave) side of leaves. Place salmon fillet in the center of one leaf (concave side up). Pour the juice of 1/2 lemon over salmon, trapping the drippings with the leaf, then season with salt and pepper. (or top with artichoke tapenade.) Place the second leaf, concave side down, over salmon. Fold the ends of the bottom leaf up to keep juices trapped, and wrap the string around the leaves to seal. Tie string in a knot.

Cook lettuce-wrapped fish on hot grill for no more than five minutes a side. For added drama, serve wrapped and have guests remove the string; the leaves are edible, and, if not too blackened, pretty good.

artichoke tapenade

Ingredients
1 can artichoke hearts
olive oil, to taste
juice and zest of 1 lemon, to taste
chives, to taste
salt and pepper, to taste

Procedure
Chop everything well, and mix, tasting as you go. This recipe is not an exacting thing, obviously!

Grilled Mussels with Herb Butter

Our most recent discovery is grilled mussels — it's really absurd how easy this recipe is. A pound of mussels (around 40) are inexpensive (even in Santa Fe) and will feed two people with some grilled bread and a salad; remember to discard any mussels that stay open before they're uncooked and that stay closed after they're cooked.

Ingredients
fresh mussels, about 1/2 pound per person
1/4 cup butter (or more)
parsley and/or other fresh herbs
lemons

Procedure
In a small pot, melt 1/4 cup (1/2 stick) butter over medium heat. Remove from heat and stir in 3 tablespoons chopped fresh parsley. Heat grill to medium-high.

Place mussels on grill in a single layer; they won't fall through the grate, but work in batches if necessary. Grill two lemon halves, cut side down.

Cook until mussels open and lemons are warmed through and browned, about five minutes. With tongs, transfer mussels to a large platter. Pour herb butter over mussels; sprinkle with coarse salt and ground pepper. Serve with lemons.

Chicken Satay Sandwich with Peanut Sauce
and Cucumber-Onion-Pepper Relish

This simple recipe from SheSimmers takes the components of a traditional Thai Satay meal and turns it into a grilled sandwich.

Ingredients
Satay marinade — recipe here
Thai peanut sauce — recipe here
cucumber relish — recipe here
boneless, skinless chicken breasts or thighs
Ciabatta rolls
cilantro

Procedure
Marinate the chicken for a few hours. Grill chicken over medium to medium-high heat until cooked; lightly grill rolls. Allow your guests to assemble their own sandwiches, topping with the cucumber relish and peanut sauce (and maybe some kimchi).

Vitello Tonnato

Seasonal Recipe of the Week
This is a recipe for a dish I learned in 1975 when I had my first kitchen job at Montana Palace in NYC, and I have loved it ever since! Yes you have to cook it, but you do that in advance, when it's cool and serve it chilled. It actually improves by doing it ahead of time. For those of you who don't eat veal, you can use the same sauce on chicken or even swordfish.

Ingredients
1 (2 to 2 1/2-pound) veal roast from the leg or loin, boned and tied
1 cup chicken stock
1 cup dry white wine
1 cup chopped yellow onions
1/2 cup chopped carrots
1/2 cup chopped celery
1 large sprig fresh rosemary
2 bay leaves
1 teaspoon black peppercorns
2 (6-ounce) cans oil-packed solid white tuna, drained
8 anchovy fillets, drained and chopped
2 teaspoons capers, rinsed, plus extra for garnish
2 tablespoons white wine vinegar
1 tablespoon fresh lemon juice
1 teaspoon lemon zest
1/2 cup Mayonnaise
Kosher salt
Freshly cracked black pepper
Chopped parsley leaves, for garnish
Lemon slices, for garnish

Procedure
In a large Dutch oven or casserole, combine the veal, chicken stock, wine, onions, carrots, celery, rosemary, bay leaves, and peppercorns. Add water as needed to cover the meat and bring to a boil. Reduce the heat to a simmer and cover tightly. Simmer, turning once, until the meat is tender and an instant-read thermometer registers 145 to 150 degrees F, about 50 minutes to 1 hour.Transfer the veal to a platter and let cool. Strain and reserve the cooking broth. Wrap the veal tightly and refrigerate until well chilled (up to 24 hours). To make the sauce, combine the tuna, anchovies, capers, white wine vinegar, lemon juice, and lemon zest in a blender or food processor and blend to a very smooth texture, about 2 minutes. Add the mayonnaise and process to blend thoroughly. Add 1 tablespoon of the reserved cooking broth. Add more, if desired, to taste or for a thinner consistency. Refrigerate in a tightly sealed container for at least 2 and up to 24 hours. (The sauce tastes best if made 1 day in advance and allowed to rest overnight). To serve, thinly slice the meat and arrange on a platter. Drizzle the sauce over each slice, season generously with the kosher salt and black pepper. Garnish by sprinkling with additional capers and chopped parsley. Arrange the lemon slices around the platter and serve. Perhaps you are going to need some wine, some bread, and a salad.

Saturday, June 08, 2013

Guest Monica Meehan: Tomato Pasta Salad

Seasonal Recipe of the Week
This is one you should only make with great, ripe tomatoes. If you're not growing your own, get some at the Farmer's Market! The amounts in the ingredients list are super vague — just adjust to your taste.

Ingredients
1 pound cut pasta (like ziti or penne)
2 or 3 ripe tomatoes
olive oil, to taste
basil, minced
mozzarella, diced (smoked mozzarella is a nice twist)
salt and pepper to taste

Procedure
Put salted water for pasta on to boil. While water heats up, cut up tomatoes into bite-size pieces. Put the tomatoes into your serving bowl, and sprinkle with salt. Stir to combine, and let sit until some tomato juice renders. Add pasta to boiling water and cook until it's al dente. While the pasta's cooking, add olive oil, basil and mozzarella to tomatoes. Drain pasta, and add to serving bowl. Adjust salt and pepper to taste. The mozzarella will melt a little from the heat of the pasta. Serve warm or at room temp, if you can wait that long. Yum!

Saturday, June 01, 2013

Pressed Nicoise on Baugette

Seasonal Recipe of the Week
This is the sandwich version of the salad Nicoise. You can find it in various forms all over the Mediterranean coast where it is made. And you make it ahead of time because in this case a little soggy is the plan.

Ingredients
1/2 loaf crusty French baguette
1 clove garlic, cut in half
4-6 basil leaves
1 (6oz) can Italian tuna packed in oil
3/4 cups Nicoise or Kalamata olives, sliced
1/2 cup red bell pepper, seeded and sliced thin
1/2 small red onion, finely chopped
1/4 cup Italian flat leaf parsley, finely chopped
1 jar or can artichoke hearts, drained and chopped (optional)
1/4 cup blanched French green beans, sliced into thirds (optional)
3 tablespoons fresh lemon juice
6 tablespoons extra virgin olive oil, plus more for drizzling
sea salt and freshly ground black pepper, to taste

Procedure
Slice the loaf of bread in half lengthwise. Remove some of the insides of the bottom half to create a trough into which the filling will go. Brush both halves with a little extra virgin olive oil. Rub each with the garlic. Line the half with the trough with the basil leaves. In a mixing bowl, combine the tuna, olives, red bell pepper, onion, parsley, artichoke hearts and green beans. In a small bowl, whisk the lemon juice into the olive oil until it is emulsified. Pour the vinaigrette into the tuna mixture and stir to combine. Season to taste with sea salt and pepper. When you are ready to assemble; spoon tuna mixture into the trough of the baguette over the basil leaves. Wrap sandwich well in plastic. Crush it down by placing a brick or heavy cast iron skillet and refrigerate, preferably with the weight, overnight. When hungry, cut sandwich in half. It tastes better if you are in France.

Saturday, September 22, 2012

Honey Lacquered Duck Breast

Seasonal Recipe of the Week
I love duck. And now that you can buy boneless duck breasts all over town, you should think about adding them to your list of quick and elegant entrees. And to dispel a myth — duck is not fatty, the fat is in the skin and you can remove it if you don't want to eat it. But cooking it with the skin makes it super yummy. Serve with a nice rice dish and a green veg and elegant dinner is served.

Ingredients
2 boneless duck breasts
1/2 teaspoon salt
1/4 teaspoon ground black pepper
4 tablespoons honey
3 tablespoons balsamic vinegar
Optional garnish of chopped nuts

Procedure
Cut small slits in the skin side of the duck breast, without slicing all the way into the flesh. Season the duck on both sides with the salt and pepper. Preheat a large skillet over medium-high heat and sear the duck breasts, skin side down, for 7 minutes, reducing the heat to medium-low after 3 minutes. Flip the duck breasts over and cook them for an additional 4 to 5 minutes. Transfer them to a plate and cover it with foil to retain warmth.

Pour the rendered duck fat into a clean container and save it for other culinary uses. Turn the heat up to medium and deglaze the skillet with the honey and balsamic vinegar, scraping up the browned bits as the sauce cooks. Simmer the honey vinegar glaze for 2 to 3 minutes, until it turns slightly thick. Season it with just a dash of salt.

Return the duck breasts to the pan, turning them a few times to coat them evenly with the honey glaze. Carve them and serve them immediately, garnished with a drizzle of extra glaze and the chopped nuts, if desired. This makes 6 servings.

Saturday, September 15, 2012

Tomato Basil Gratinée

Seasonal Recipe of the Week
This recipe is mostly tomatoes, warmed up and sharpened with a little garlic and basil, with just enough bread tossed in to sop up the juices. And some cheese on top — because, why not — oh yes, and some bacon fat!

Ingredients
3 tablespoons bacon fat
2 cups (1/2-inch diced) French bread, preferably a crusty baguette
16 plum tomatoes, cut 1/2-inch dice, about 2 1/2 pounds (use the best tomatoes you can find, beefsteak will be juicier)
1 tablespoon minced garlic (3 cloves)
2 tablespoons sugar (optional )
2 teaspoons kosher salt
1 teaspoon freshly ground black pepper
1/2 cup julienned basil leaves, lightly packed
1 cup freshly grated Parmesan cheese

Procedure
Preheat the oven to 350 degrees F. Heat the bacon fat in a large 12 inch saute pan over medium heat. Add the bread cubes and stir to coat with the oil. Cook over medium to medium-high heat for 5 minutes, stirring often, until the cubes are evenly browned. Add the tomatoes, garlic and sugar to then pan and continue to cook, stirring often, for 5 minutes. Season with salt and pepper, add the basil and remove from the heat.

Pour the tomato mixture into a shallow (6 to 8 cup) baking dish. Sprinkle evenly with the Parmesan cheese and drizzle with 2 tablespoons of olive oil. Bake for 35 to 40 minutes until the top is browned and the tomatoes are bubbly. Serve hot or warm.

Saturday, September 01, 2012

Bloody Mary Salad

Seasonal Recipe of the Week
I love when a drink turns into a salad — what fun!

Ingredients
1 cup finely chopped red onion
3 tablespoons Sherry vinegar, divided
2 pounds cherry or grape tomatoes, halved
1 cup chopped celery
1/2 cup brined green olives, plus 2 tablespoons extra brine from the jar
2 tablespoons prepared white horseradish
1 tablespoon Worcestershire
1 teaspoon Tabasco
1/2 teaspoon celery seeds
1/4 cup extra virgin olive oil
Salt and pepper to taste

Procedure
Mix onion with 1 tablespoon of sherry vinegar and let sit for 10 minutes. Next add tomatoes, celery and olives. In separate bowl whisk together 2 tablespoons vinegar, olive brine, horseradish, Worcestershire, Tabasco, and celery seeds. Now slowly drizzle in olive oil mixing hard as you go. Toss with tomatoes and season with salt and pepper. May be made up to 4 hours before serving. Can also be served in a cucumber cup as a hors d'oeuvre!

Guest Teri Buhl: Canning

Seasonal Recipe of the Week
This week I ran an encore of a great segment I did with pal Teri Buhl about canning. There are some of her recipes already in the archives as well as the quarter au quarter recipe for the best French pound cake. So look up the recipes and start jarring it up!

Saturday, August 18, 2012

Chilled Plum, Raspberry and Tarragon Soup

Seasonal Recipe of the Week
Fruit soups are a great item to make in the summer, especially now when the plums are so delicious. And I love the inclusion of tarragon to the flavor list. I like to garnish this with a little scoop of creme fraiche and a fresh tarragon sprig.

Ingredients
1 1/2 pounds (about 6) ripe red plums, plus 1 plum, skin on and cut into 1/4-inch dice for garnish
6 ounces raspberries, plus more for garnish
1 cup white wine or champagne
6 tablespoons sugar
3 sprigs tarragon, plus more for garnish
2 tablespoons triple sec, Cointreau, or Grand Marnier (optional)
1/4 cup water

Procedure
Fill a large bowl with ice and water; set aside. Bring a medium pot of water to a boil. Add plums; blanch until skin begins to peel, 2 to 3 minutes. Remove plums from water; place in the ice bath until cool. Remove plums from ice bath, reserving ice bath.

Peel plums, remove pits, cut into chunks, and place in a medium saucepan. Add the raspberries, wine, sugar, tarragon, triple sec (if using), and the water to the saucepan; cover, and bring to a simmer over medium heat. Reduce heat to medium low, and allow to simmer until plums are falling apart, 15 to 20 minutes. Remove from heat, transfer to a clean bowl, and place in the reserved ice bath, stirring occasionally, until cold. Remove tarragon sprigs from cold mixture, and transfer mixture to a blender. Puree, working in batches if necessary. Serve garnished with diced plum, raspberries, and tarragon.

Saturday, August 11, 2012

Stuffed Lemons in the Oven

Seasonal Recipe of the Week
I love when I discover a recipe with a procedure that never occurred to me. It opens up all sorts of new possibilities. This is such a recipe which I found online.

Ingredients
2 lemons
2 balls buffalo mozzarella, sliced into 1/4 inch pieces
4 anchovy filets
4 fresh basil leaves
2 ripe cherry tomatoes, halved
Sea salt and fresh ground black pepper

Procedure
Preheat your oven to 400 degrees. Remove the ends of the lemons & discard them (don’t cut in too far — you want to keep a closed bottom). Then cut the lemons in half crosswise, giving you little lemon bowls. Using a small knife, remove the lemon flesh, leaving you with 4 hollow lemon rind bowls. (Again, you don’t want to break-into the rind.) Cut a piece of mozzarella to fit inside, then lay a basil leaf, half an anchovy fillet and half a cherry tomato on top with a pinch of salt & pepper and a little drizzle of good olive oil. Put another slice of mozzarella on top — the lemon should now be filled up. Do the same to the rest of the lemon bowls. Place on a baking sheet & cook in a preheated oven for 10 to 15 minutes, until golden & bubbling. Remove from the oven and serve immediately. To eat: scoop the mozzarella out and eat with the bread to soak up any juices! I was thinking this would be delicious with gorgonzola and caramelized apple slices or how about Robiola and a little fennel, need I go on?

Saturday, August 04, 2012

Swiss Chard with Pancetta and Hard Boiled Eggs

Seasonal Recipe of the Week
Here is a great way to serve Swiss Chard that even your kids will eat, must be the pancetta. Pancetta is like Italian bacon and you can substitute bacon or even diced prosciutto, or even dare I say smoked tofu of you like, but then you will need to up the oil a little.

Ingredients
2 bunches Swiss Chard
salt and pepper
1/4 pound pancetta or bacon or prosciutto
3 tablespoons evoo
1 clove minced garlic
4 tablespoons balsamic vinegar
2 tablespoons red wine or sherry vinegar
4 tablespoons chopped parsley
5 peeled, hard-boiled eggs, chopped
1/2 teaspoon cayenne pepper

Procedure
Cut the ribs out of the chard then chop the ribs and the leaves. Blanch the ribs in boiling water with a good dose of salt in it and cook about 7 minutes till tender. Using a slotted spoon remove the ribs and now add the leaves and cook briefly 3-5 minutes till tender then drain well and rinse under cold water till cool. Squeeze out the excess water and chop a little finer and squeeze out again. In a frying pan cook the pancetta or bacon about 5 minutes. If you use bacon pour off the fat at this point. Now add 1 tablespoon olive oil and garlic and continue to cook till golden. With a slotted spoon remove pancetta pieces and garlic to paper towels and set aside. Add 2 tablespoons balsamic to the same pan and de-glaze it which means using a wooden spoon scrape all the burnt bits from the bottom and sides of the pan. Now pour this yummy mix into a bowl. Into this same bowl add 2 tablespoons balsamic vinegar, 1 tablespoon red wine or sherry vinegar and the 2 remaining tablespoons of olive oil to the bowl and mix well. Now add the chard, pancetta and garlic, parsley, and remaining oil and vinegar. Season to taste. Gently fold in the eggs, garnish with a little more parsley and a pinch of cayenne pepper. This recipe makes 4-5 servings.