Showing posts with label balsamic vinegar. Show all posts

Saturday, March 11, 2023

Shrubs, not just for your garden anymore!

Refreshing Beverage of the Week
I love the way words and terms define us. I used to erase, now I delete. I used to call someone, now I ping them. I used to say "I'm not in the mood to talk about that," now I say "let's circle back to that and take it offline." (Just kidding, I never say that shit but I learned it when I worked in corporate kitchens in NYC.) I used to eat everything, I was a "good" eater and exercised whenever, now I am a senior citizen obsessed with micronutrients and strengthening my core. Currently we are obsessed with probiotics, kombucha, apple cider gummies, actually all kinds of gummies, and kraut. Life goes on.

My clients (I am a private chef) have decided to limit their alcohol intake and have asked me to make mocktails. These drinks mirror actual cocktails using non-alcoholic booze substitutes — which, frankly, taste awful and are terribly expensive. So I searched the internet for recipes and, so far, not too many were drinkable. They are unhealthy and usually full of high-sugar fruit juice.

The non-alcoholic beverage market is booming and I have tried about 5 different brands and I would say the best-tasting ones are the gin alternatives. Juniper berries are very distinctive and even in a weird herbal base that flavor reminds you of gin. I tried a non-alcoholic tequila beverage made with apple. I accidentally spilled some, and it was so vile I had to scrub down my counter with lemon juice to kill the odor. So I started looking for other options.

This brings me to the subject of shrubs. I first had a shrub at Russ & Daughters Cafe, and it was love at first sip! A shrub is a drink made with fruit- and herb-infused vinegars (usually apple cider vinegar), a sweetener, and some club soda or anything sparkly. You'll find tons of recipes out there to make the vinegar. I am going to share a great all-around method and then some recipes. There are two ways to make a shrub: cold and hot. Hot is faster, cold is better.

Basic recipe for any fruit shrub · Food52

Ingredients
1 pound chopped fruit
2 cups sugar
2 cups vinegar (usually apple cider, I also like using rice wine vinegar, coconut, or white balsamic)
optional: ginger; rosemary; thyme; cardamon; bay leaves; etc.

Procedure
Assemble your fruit (sliced or gently mashed) in a bowl, and toss it with the sugar. Let this mixture sit, covered securely with a dishtowel, on your kitchen counter for about 2 days. Stir once a day. It should start to look very juicy. After 2 days, strain the mixture into a measuring cup, discard the fruit, then combine the syrup with approximately an equal amount of vinegar (again, your choice, but apple cider vinegar is a good place to start). Do this slowly, tasting as you go, so that you get a shrub that is sharp but tasty.

That's it! Pour it into a jar and stick it in the fridge. Here are two recipes with great combo of flavors.

Mixed berry shrub · Bon Appetit

Ingredients
12 ounces berries (such as raspberries, blackberries, blueberries, or strawberries), sliced or quartered if large
1 1/2 cups (or more) granulated sugar
1 cup (or more) vinegar (such as red wine, white wine, apple cider, white balsamic, or unseasoned rice)

Procedure
Gently mash berries in a medium bowl with a fork. Transfer to jar, add sugar, and stir to combine. Seal jar and let fruit mixture sit at room temperature, shaking a couple of times, until berries are very soft and falling apart and sugar is at least mostly dissolved, about 1 day (mixture should look very juicy).

Strain fruit mixture through a fine-mesh sieve into a medium bowl. Line sieve with a layer of cheesecloth if you want to catch every bit of seed and fruit pulp, discard fruit. Scrape any undissolved sugar left in jar into bowl. Add vinegar to syrup and stir to combine. Taste shrub and adjust of necessary. Pour shrub into a clean jar; cover with lid and chill until flavors come together and mellow, at least 1 week.

Shrub can be made 6 months ahead. Keep chilled.

To make a drink, pour 2 Tbsp. shrub into a glass filled with ice and top off with club soda; stir gently to combine. Garnish with berries and/or herbs. Thai basil is a good choice!

Butternut Sage shrub · The Spruce Eats

Ingredients
2 cups good-quality apple cider vinegar
2 cups granulated sugar
2 cups cubed butternut squash
1/2 cup fresh sage leaves, from about 8 sprigs
Cold seltzer, ginger ale, or still water, for serving

Procedure
Place the apple cider vinegar in a medium saucepan over medium heat, then stir in the sugar. Lower the heat to a simmer and continue to cook, stirring, until the sugar dissolves.

Add the butternut squash and sage. Cover and simmer, stirring occasionally, until the squash is softened and easily pierced with a fork, 10 to 15 minutes. Remove from the heat. Lightly smash the softened squash with a potato masher or wooden spoon in the saucepan to release more flavor. Cover and steep for 3 hours.

Strain the squash and sage from the liquid using a fine-mesh strainer. Bottle the shrub, seal, and refrigerate for 3 to 4 days before using.

To make a drink, pour 1 1/2 ounces (3 tablespoons) of the butternut-sage shrub into a glass (over ice, if you like). Top with about 6 ounces (3/4 cup) of cold seltzer, ginger ale, or water, pouring more or less to taste. Stir well.

Thursday, February 19, 2015

Winter Jams

Even though it's winter, you can still play with fruit! At my new job, I get to do all sorts of fun projects. My current new favorite task is making the jams and jellies we serve with our breakfasts. Now, this will probably get even better in the spring when my palette of seasonal ingredients expands, but for now I am finding all kinds of great recipes to explore. We use them up so fast that I do not have to get involved in the canning process so I have not included it in the instructions, but it's not that complex and you can find excellent instructions elsewhere online. Here are 4 to try at home:


Grapefruit and Campari Marmalade

Ingredients 
6 pink grapefruits (or Ugli Fruit, which I used)
2/3 cup Campari
5-6 cups sugar (the amount is based on volume of prepared fruit)
Procedure
Peel the grapefruit, remove the white pith, and cut the rinds into 2-inch pieces. Bring some water to a boil in a small pot. Drop in the rinds and boil for 1 minute. Drain and discard the water. Repeat two more times using fresh water each time.  When done drain the rinds well. Chop the peeled grapefruit flesh into chunks and pick out the seeds (or just use seedless ones, d'oh!). Discard the seeds. Place the chopped fruit and accumulated juices into a food processor fitted with a cutting blade and process for 1 minute, until the mixture is well-chopped and frothy. Measure the amount of chopped fruit and juice. Return 1 cup of the fruit to the food processor. and process with the rinds till they are in small bits. Now use the same amount of sugar as the total amount of the fruit and juice mixture. Place the sugar in the pot with the fruit. Stir the chopped rinds into the fruit and sugar mixture in the large heavy pot. Stir in the Campari. Bring to a boil, stirring, and reduce heat to maintain a constant simmer. Cook for 25 minutes, stirring gently to prevent scorching and boil-overs. The color will darken as the marmalade thickens.

If you have any doubts, you can test the marmalade: put a tablespoon on a small plate, put the plate in the freezer for three minutes. The marmalade is ready if it no longer is runny. Note: it's a traditional marmalade in the sense that it's a bit bitter — much like myself. This recipe makes about 12 half-pint jars.


Grilled Anjou Pear Butter

Ingredients
3 pounds ripe Anjou pears quartered, seeded, skin on
3 tablespoons lemon juice
1/2 cup sugar
2 1/2 teaspoons ground cardamom
1/2 cup water

Procedure
Take your quartered pears and brown them on a grill (or in the broiler). Combine the charred pears with all the ingredients in a large pot. Bring the mixture to a boil then reduce the heat and simmer for about 20 minutes or until very tender. Run the mixture through a food mill, which will remove the peels (and any seeds you missed) and leave you with a lovely purée. Pour the purée into a pot and simmer on the stove till thickened, about 1 hour on a very low flame. Or you can roast in at 300 degree oven for about 2 hours, stirring every 30 minutes so it won't stick, until it reaches the consistency you like.


Red Grape and Cassis Jelly

Ingredients
3 pounds (about 2 quarts) of flavorful grapes, Concord are best, but ruby red work well, too
1/2 cup water
1/2 cup Cassis black currant liqueur
1 1/4 cup granulated sugar
3 tablespoons apple pectin
1/4 cup lemon juice

Procedure
Wash and stem grapes — don't worry if small stems remain on the fruit, since they will be strained out along with the seeds. In a nonreactive, heavy-bottomed saucepan, bring grapes, water, and Cassis to a boil and then reduce to a simmer. Simmer grapes, periodically stirring and crushing, until they've begun to lose their shape, you can see their color changing, and the liquid increases — about ten minutes. Remove from heat and cool slightly. Set a food mill (with the smallest sieve in place) over a large, heatproof bowl or pitcher, and pour grapes and cooking liquid through. Mill until all that remains are the seeds, skins, and stems. You will have about 4 cups (32 ounces) of grape pulp. In the same nonreactive saucepan, stir grape pulp together with sugar, pectin, and citrus juice and bring to a boil over high heat. Cook until the mixture registers 220 degrees on a candy or instant read thermometer. Turn off heat and skim any foam with a spoon. This will gel as it cools.


Strawberry and Vanilla Preserves with Balsamic Reduction

Yes, yes, I know strawberries are not a winter fruit, but they are really cheap right now, and sometimes only a berry jam will do!

Ingredients
2 pounds fresh strawberries, hulled and cut in quarters
5 cups sugar
1 tablespoon Balsamic Reduction (see below)
1 teaspoon vanilla extract
1 pinch salt

Procedure
In a pot, combine the strawberries and sugar. Bring to a rolling boil and cook, stirring frequently, for 15 to 20 minutes, or until the berries start to fall apart and temperature of the mixture has reached 220 degrees, which means it will be nice and thick and set. Now stir in the balsamic reduction and the vanilla. Wasn't that was easy?

balsamic reduction

What's Balsamic reduction? Just what it sounds like, you take Balsamic vinegar and cook it down until the volume is reduced, and the flavor is concentrated. In a medium-sized, nonreactive saucepan bring 1 cup of vinegar to a simmer over medium-high heat, and then turn down to low. Simmer for about 10 to 15 minutes to thicken and reduce. Keep an eye on it — you don't want it to burn. When it coats the back of a spoon, you're good to go.

Tuesday, November 04, 2014

Adventures in Molecular Gastronomy, Part 1


What is Molecular Gastronomy? It's a culinary trend that started around 1992 — a style of food preparation that blends physics and chemistry to transform the tastes and textures of food. It borrows tools from the science lab and ingredients from the food industry to make foods we think we know behave in a totally different way. Two of the big superstars in this weird world are Wylie Dufresne, who runs a trendy East Village establishment called WD-50 (which will soon be closing due to real estate issues), and Ferran Adrià, chef at Spain's now-closed 3-Michelin star elBulli which was voted the best restaurant on the planet a few times. Some of the things you can do with this technology are make liquids into foam, gel, pearls, or crusty bits. Some people find this amazing, I always found it kind of disgusting. Flavored saliva has never been a goal of mine.

So with this totally biased outlook, I never really explored this technique, but was secretly curious how it worked (I like to know how everything works). And then, much like other trends, it passed from the realm of ultra-haute cuisine into the realm of DIY, so I figured now was my time to try it out. In stepped Uncommon Goods, an online catalog full of all kinds of cool stuff from earrings to housewares, and they sent me a molecular gastronomy starter kit to review.

For those who don't want to read the whole thing, here's the TL;DR version: It's cooler and more fun than I expected. But I need to try some things again, because, apparently, I'm incapable of reading all the instructions first. I'll post a follow-up review next week.

So, the well-designed and beautifully packaged kit costs $65.00 and comes with everything including sachets of chemicals, a DVD, a beautiful recipe book (there's a $49 version that comes without the book) and even some cool tools (which I did not open because I did not recognize them until half way through my tests). There is enough stuff to do lots of different experiments so I will continue my tests and will post again when I make something actually edible with my bits. In the meantime, here are the results of my first 3 tests.

All recipes are from the pamphlet that comes with the kit. A note about that little booklet – I started at the beginning and started making the first recipe, which was confusing, but I forged ahead anyway. It wasn’t until later that I realized that along further in the pamphlet were more explicit instructions, including troubleshooting tips and technical points. I should have read the whole thing first!

Reverse Spherification - Yogurt Ravioles

Ingredients
2 cups water
1/3 cup milk
1/2 cup 2% plain yogurt
Sodium Alginate 2 grams (1 sachet provided)
Calcium Lactate 2.5ml (1 sachet provided)

Procedure
In a flat-bottomed bowl, dissolve the Sodium Alginate in 2 cups of water using a hand held burr mixer. Set aside for 15 minutes. Dissolve Calcium Lactate in milk and yogurt using a spoon. Fill one measuring spoon with the mixture and drip it into the sodium alginate bath. Stir the spheres for 3 minutes to allow the membrane to form. Using a slotted spoon, remove the Ravioles and put into a bath of water to rinse.

My problems
I apparently do not follow instructions well. I used low-fat yogurt and fat-free milk, I think this was why things were so wobbly and gooey. I also could not figure out how to get a smooth, round ball. It wasn't until I realized there were tools provided in the larger box which would make this job easier. Needless to say, I will redo this test and repost results later. The other problem is the instructions say do not let them touch while you are stirring them, does this mean you need to make one at a time? I did however make a cool-looking Michelin man out of yogurt!


Emulsification - Lemon Cloud

Ingredients
2/3 cup water
2/3 cup lemon juice
2 g Soy Lecithin (1 sachet provided)

Procedure
Combine Soy Lecithin, lemon juice, and water and, using a hand blender, whip it up to produce foam.

My problems
I did not get much foam. Then I read the technique notes which said the best way to use the hand mixer is in a flat-bottomed bowl with the hand blender at a tilt with it partially submerged. Okay, but what do you do with the foam?


Gelification - Balsamic Vinegar Pearls

Ingredients
4 cups cold vegetable oil
3/4 cup Balsamic vinegar
2 g Agar Agar (1 sachet provided)

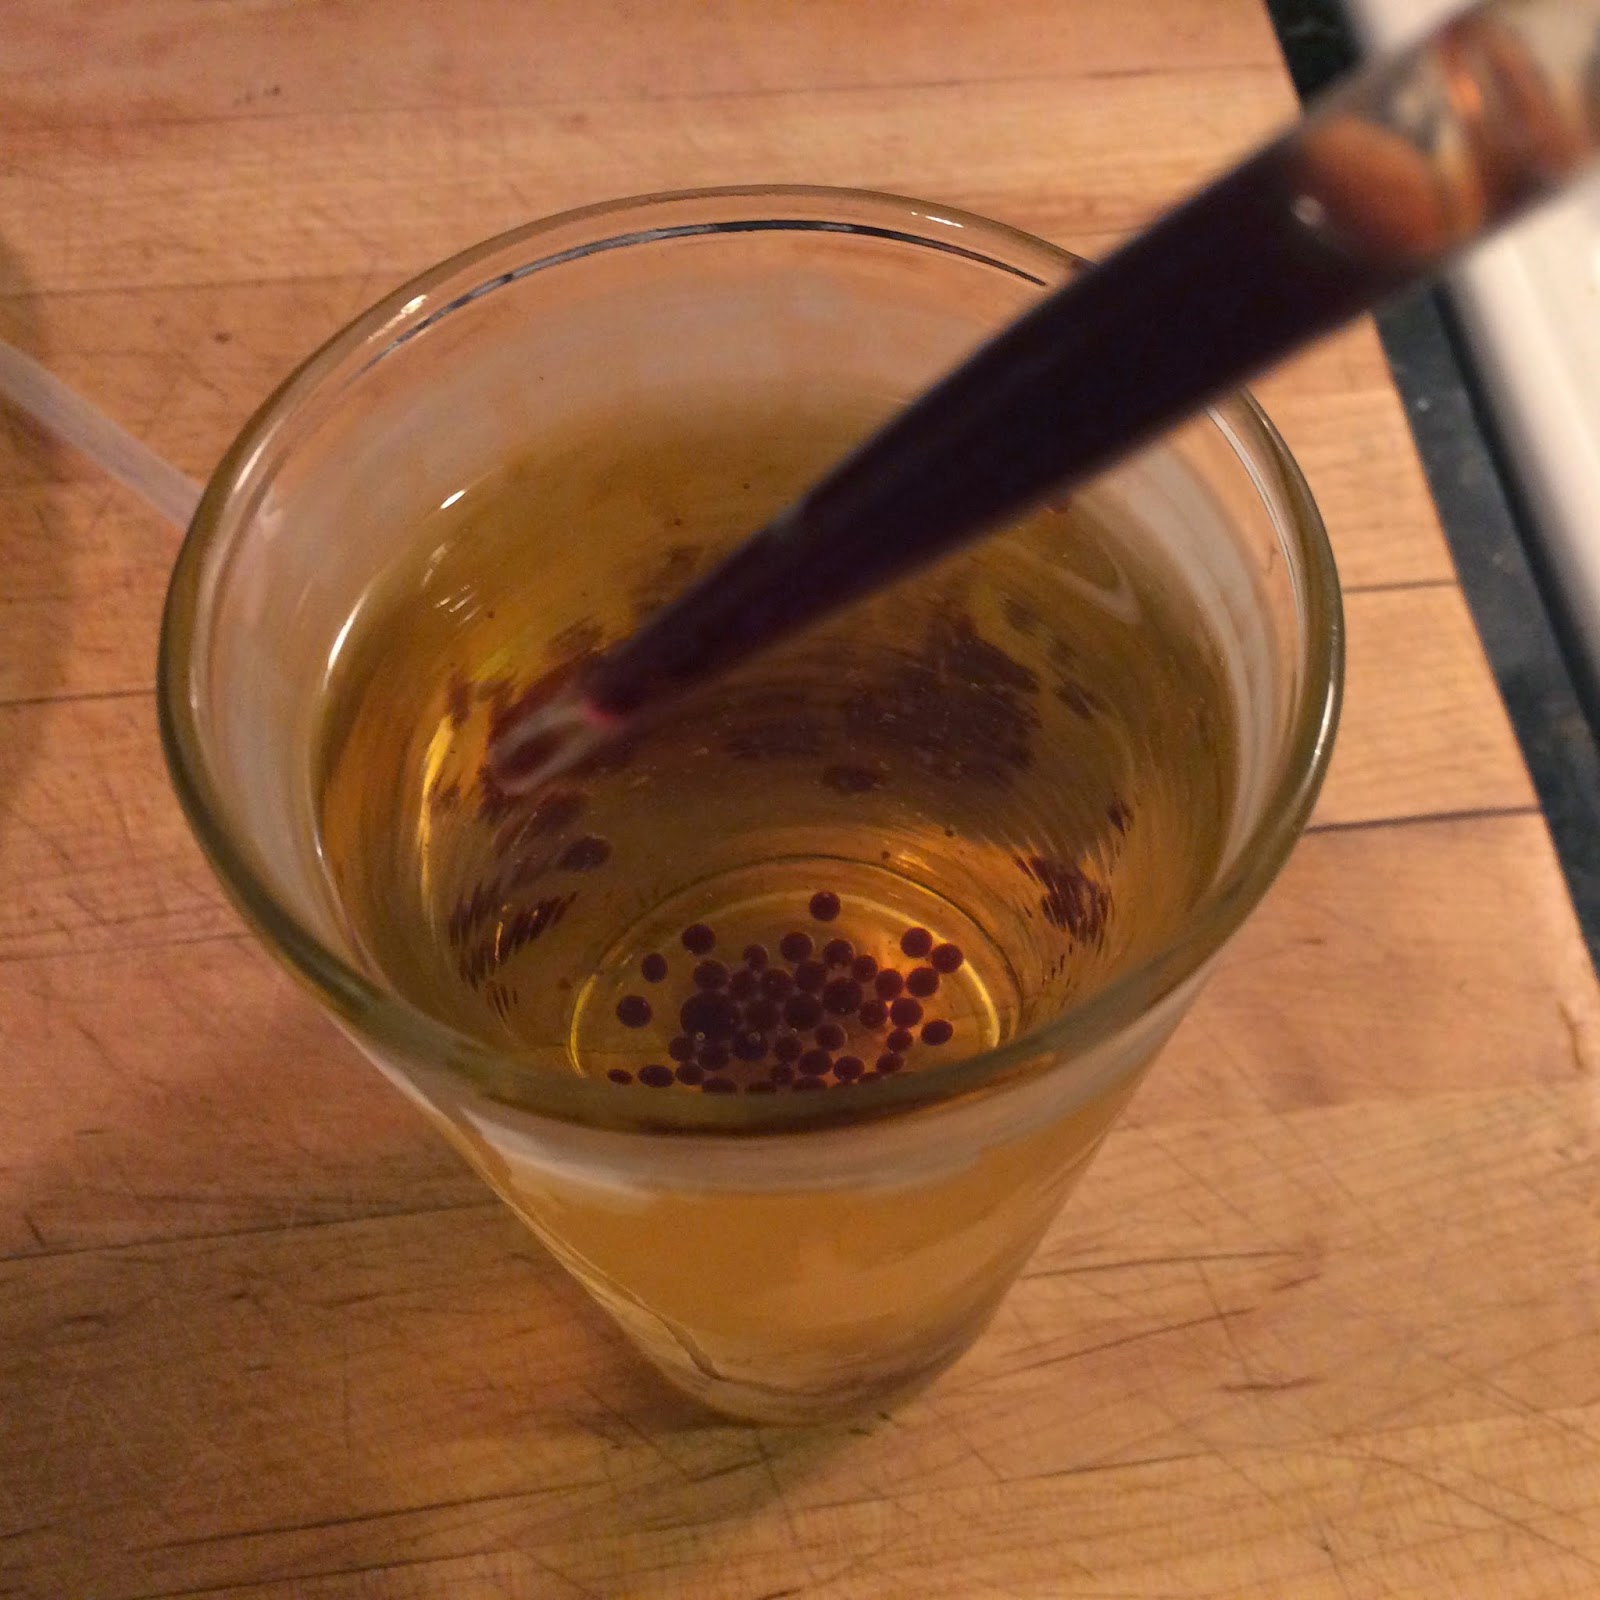
Procedure
Place the oil in a tall glass and put into freezer for at least 30 minutes. Combine Agar Agar and Balsamic vinegar in a small pot and bring to a boil. Remove oil from freezer. Using the pipette provided, pick up some balsamic mixture and drop it into the oil. Pearls will form and drop to the bottom. When you are done, strain out pearls and put into a bowl of water to rinse. You can reuse the oil. The pearls look just like caviar!

My problems
Whoops, I had none! This recipe was by far the winner! These are cool and delicious and would be great in a salad, on a piece of fish, or with some cheese, or a beautiful garnish on an hors d'oeuvre.


In conclusion, I had fun with this kit. It’s always good to learn something new. I plan to doing more experimentation and will start to find recipes (using the big book provided) that hopefully create products that are tasty, not just strange, and will post again next week.

Thanks again to Uncommon Goods! Check out these links for these cool wine glasses and wine-related gifts!

Saturday, March 09, 2013

Kasha Salad with Mushrooms and Peas

Low-Cal But Still Lovely
Grain salads are greatly undervalued — they're full of nutrition, easy to make, and quite filling. It's time to get into the fiber!

Ingredients
1 tbsp. balsamic vinegar
1 tbsp. canola oil
1/4 cup fresh lemon juice
1/2 lb. fresh mushrooms
1 1/2 cups frozen or fresh peas
1 cup kasha
1/2 tsp. garlic salt
1 small shallot, finely chopped

Procedure
Defrost the peas if necessary and set them aside. Slice the fresh mushrooms and put them into a small bowl with the lemon juice (the juice will prevent them from discoloring). Toss the mushrooms well and set them aside. Add the kasha to 2 cups of boiling water and cook it, stirring frequently, until it is tender, about 5 minutes. Drain the kasha, rinse it well, and drain it again. Transfer the kasha to a large bowl. To prepare the dressing, drain the mushrooms, reserving the lemon juice. To this liquid add the vinegar, shallots, salt, and some pepper. Stir the ingredients together. Whisking vigorously, pour in the oil in a thin, steady stream. Continue whisking until the dressing is well combined. Set the dressing aside. Add the kasha, fresh mushrooms, and dressing to the peas. Combine the ingredients well and serve immediately. Throw in some grilled shrimp and you have a party!

Saturday, November 24, 2012

Sweet Potato

Excellent Ingredient of the Week
Sweet potatoes are a delicious item when prepared right. For me, that means in baked in the oven, then split in half and eaten with a chunk of butter while watching the 4:00 movie which hopefully is an Elvis beach extravaganza. That’s the way me and my mom used to roll when I came home from school as a teenager. As an adult (and I use that term loosely), I like to make baked sweet potato planks and dip them in chipolte ketchup. I think they should never meet marshmallows under any circumstance. But what else do we know about the sweet potato? Let's use the google...

The sweet potato is a tuberous root vegetable belonging to the same family of plants as the morning glory. It's a particularly popular food crop in the south, and you'll find it in markets all over the US. Sweet potatoes are native to Central America. They are considered a staple in many countries and have been cultivated in Southern states since the 16th century. Nutritionally, sweet potatoes are an excellent source of vitamin A and a good source of potassium and vitamin C, B6, riboflavin, copper, pantothetic acid and folic acid.

Sweet potatoes come in two main varieties here in the States. One has a golden skin with creamy white flesh and a crumbly texture. The other has a copper skin with an orange flesh that is sweet and soft. Americans have been calling the orange-fleshed variety of sweet potatoes "yams" since colonial times when Africans saw familiarities in them to the tuberous variety. The USDA decided to label them as "yams" to differentiate the two varieties. Both varieties of sweet potato, including "yams" can be widely found in supermarket.

Yams are native to Africa and Asia and other tropical regions. Yams are starchy tubers that have an almost black bark-like skin and white, purple or reddish flesh and come in many varieties. The tubers can be as small as regular potatoes or grow upwards of five feet long.The word yam comes from an African word, which means "to eat." The yam holds great importance as a foodstuff because it keeps for a long time in storage. Real Yams can be found in international markets, such as those that specialize in Caribbean foods.

Here is a great unusual sweet potato recipe.

Sautéed Sweet Potatoes and Spinach

Ingredients
2 tablespoons olive oil
2 large sweet potatoes
1 1/2 teaspoons curry powder
1/2 cup water
1/2 cup red onion
1 1/2 pounds spinach
1 tablespoon balsamic vinegar
Coarse salt and ground pepper

Procedure
Heat olive oil in a large nonstick skillet over medium heat. Cut sweet potatoes into cubes; cook, stirring, until starting to soften, 8 to 10 minutes. Add curry powder. Cook 1 minute. Add water and chopped red onion. Cook, stirring, until water evaporates and potatoes are tender and browned, about 10 minutes. Transfer to a bowl. In the same skillet, cook spinach in two batches, adding second batch when first wilts, 2 minutes. Drain; add to potatoes.Stir in balsamic vinegar; season with coarse salt and ground pepper.

Saturday, September 22, 2012

Honey Lacquered Duck Breast

Seasonal Recipe of the Week
I love duck. And now that you can buy boneless duck breasts all over town, you should think about adding them to your list of quick and elegant entrees. And to dispel a myth — duck is not fatty, the fat is in the skin and you can remove it if you don't want to eat it. But cooking it with the skin makes it super yummy. Serve with a nice rice dish and a green veg and elegant dinner is served.

Ingredients
2 boneless duck breasts
1/2 teaspoon salt
1/4 teaspoon ground black pepper
4 tablespoons honey
3 tablespoons balsamic vinegar
Optional garnish of chopped nuts

Procedure
Cut small slits in the skin side of the duck breast, without slicing all the way into the flesh. Season the duck on both sides with the salt and pepper. Preheat a large skillet over medium-high heat and sear the duck breasts, skin side down, for 7 minutes, reducing the heat to medium-low after 3 minutes. Flip the duck breasts over and cook them for an additional 4 to 5 minutes. Transfer them to a plate and cover it with foil to retain warmth.

Pour the rendered duck fat into a clean container and save it for other culinary uses. Turn the heat up to medium and deglaze the skillet with the honey and balsamic vinegar, scraping up the browned bits as the sauce cooks. Simmer the honey vinegar glaze for 2 to 3 minutes, until it turns slightly thick. Season it with just a dash of salt.

Return the duck breasts to the pan, turning them a few times to coat them evenly with the honey glaze. Carve them and serve them immediately, garnished with a drizzle of extra glaze and the chopped nuts, if desired. This makes 6 servings.

Saturday, August 04, 2012

Swiss Chard with Pancetta and Hard Boiled Eggs

Seasonal Recipe of the Week
Here is a great way to serve Swiss Chard that even your kids will eat, must be the pancetta. Pancetta is like Italian bacon and you can substitute bacon or even diced prosciutto, or even dare I say smoked tofu of you like, but then you will need to up the oil a little.

Ingredients
2 bunches Swiss Chard
salt and pepper
1/4 pound pancetta or bacon or prosciutto
3 tablespoons evoo
1 clove minced garlic
4 tablespoons balsamic vinegar
2 tablespoons red wine or sherry vinegar
4 tablespoons chopped parsley
5 peeled, hard-boiled eggs, chopped
1/2 teaspoon cayenne pepper

Procedure
Cut the ribs out of the chard then chop the ribs and the leaves. Blanch the ribs in boiling water with a good dose of salt in it and cook about 7 minutes till tender. Using a slotted spoon remove the ribs and now add the leaves and cook briefly 3-5 minutes till tender then drain well and rinse under cold water till cool. Squeeze out the excess water and chop a little finer and squeeze out again. In a frying pan cook the pancetta or bacon about 5 minutes. If you use bacon pour off the fat at this point. Now add 1 tablespoon olive oil and garlic and continue to cook till golden. With a slotted spoon remove pancetta pieces and garlic to paper towels and set aside. Add 2 tablespoons balsamic to the same pan and de-glaze it which means using a wooden spoon scrape all the burnt bits from the bottom and sides of the pan. Now pour this yummy mix into a bowl. Into this same bowl add 2 tablespoons balsamic vinegar, 1 tablespoon red wine or sherry vinegar and the 2 remaining tablespoons of olive oil to the bowl and mix well. Now add the chard, pancetta and garlic, parsley, and remaining oil and vinegar. Season to taste. Gently fold in the eggs, garnish with a little more parsley and a pinch of cayenne pepper. This recipe makes 4-5 servings.

Saturday, June 16, 2012

Buffalo Mozzarella With Balsamic Glazed Plums and Pine Nuts

Nice New Nibbles
Yesterday I was served some boring bruschetta again for the 200th time. Yes, I love mozzarella and basil and tomato, but there are other more wonderful things you can do with mozzarella — especially if you bother to buy the good stuff, the buffalo kind. Here is a great option from Food 52. It opens up all kinds of possibilities.

Ingredients
1 large ball buffalo mozzarella, sliced into 1/4-inch thick rounds
4 ripe plums, pitted and quartered
1 1/2 cup balsamic vinegar
1/2 cup fresh mint, chopped
1/4 cup pine nuts, toasted
1 splash olive oil
Salt and pepper, to taste

Procedure
Put vinegar in a medium saucepan and bring to a boil over medium heat. Adjust heat to low and simmer until it is reduced nearly three-quarters in volume and thickened to a syrup, about 15 minutes. Add plums to syrup turning gently to coat and continue to cook for another 4-7 minutes more. Turn off heat and let cool. Meanwhile assemble mozzarella slices on platter, allowing to overlap slightly and season with salt and pepper to taste. WIth a fork, remove plums from syrup and place atop cheese, then top with the remaining syrup, pine nuts and mint. Drizzle with olive oil and serve with some baguette slices.

Saturday, June 02, 2012

Sorrel

Excellent Ingredient of the Week
Sorrel sort of tastes like lemony, tart spinach. It grows really well here in pots and mine comes back every season. It is the first to show up in spring and the last to leave in late fall. I love to nibble on it in the garden while I tend my plants and water. In Europe, it's very common but I have a hard time finding it in local markets, which is why I started growing it.

The tart, lemony flavor of sorrel is due to the presence of oxalic acid. People with arthritis or kidney stones should eat only small quantities, as oxalic acid can aggravate these conditions. The herb tastes best in early spring, and becomes increasingly bitter as the season progresses. Use the tender, young leaves in salads, and the larger leaves for soups, stews and sauces. Sorrel also complements goat cheese, eggs and poultry.

Sorrel has long been known to be both edible and medicinal. Sorrel is rich in vitamin C, sorrel was valued for centuries for its ability to prevent scurvy, a serious, even life-threatening problem when fresh fruits and vegetables were not available.

This is what I do with sorrel: Mix it into my garden salad along with mesculun mix, beet greens, tatsoi and arugula. Or you can make aioli with it — puree in Sorrel and serve it with fish. It's great with vichysoise, chiffonade it and add it to omelets. If none of those ideas appeal to you, here are two more:

Beet Salad with Sorrel with Pistachio Dressing

Ingredients
2 bunches beets
1/4 c pistachios + extra for garnish, roasted & unsalted
3-4 T olive oil
2 T balsamic vinegar
1 bunch sorrel
2 cups croutons

Procedure
Roast your beets to your liking (I roast mine at 375, covered, in a baking dish with 1/4 c water). Peel and slice into wedges.

Blend the pistachios in a blender with 3/4 c water and blend until very smooth. Strain out water and season with salt and pepper. Whisk this with the olive oil and balsamic vinegar. Check for seasoning and toss a few of the tablespoons with the beets.

Stem the sorrel and julienne the leaves. Put the julienned leaves on the bottom of a plate, top with the beets, then the croutons, then drizzle with some remaining dressing. Finish with some extra pistachios and some more pepper.

Sorrel Pesto

This is great as an interesting pasta sauce or a thick sauce for fish.

Ingredients
2 cups coarsely chopped fresh sorrel, ribs removed
1/3 cup packed fresh parsley leaves
2 garlic cloves, roughly chopped
1/3 cup freshly grated parmesan
1/4 cup pine nuts
1/2 teaspoon salt
1/4 cup olive oil

Procedure
In a food processor or blender puree the sorrel, the parsley, the garlic, the parmesan, the pine nuts and the oil, transfer the pesto to a jar with a tight-fitting lid and chill it, covered. The pesto keeps, covered and chilled, for 2 weeks. Makes about 1 cup.

Saturday, December 04, 2010

Cassis

Excellent Ingredient of the Week
Ever since I made my first roast duck with my dad — smothered in Cassis sauce — I have loved the flavor of this French black currant brandy. It is a great flavoring to add to your repertoire. The Brits make a great jellied candy with it, as well as a beverage called Ribena, which they forced the children to drink during the war for extra nutrition because it was high in vitamin C and some other good stuff.

So what is Cassis? Crème de cassis (its formal name) is a beautiful, red, sweet, blackcurrant-flavored liqueur. The black currants are smashed into refined alcohol, with sugar subsequently added. Cassis is one ingredient of a Kir Royal, which is a cocktail made with champagne. While crème de cassis is a specialty of Burgundy, it is made in other cities of France, as well as in Luxembourg and Quebec.

I like to use it in vinaigrettes and sauces. Here is a classic duck recipe and a wonderful ice cream recipe using Cassis. It’s also great in whipped cream, but who isn’t?

Pan-Seared Duck Breast with Cassis Compote

Ingredients
4 (6-ounce) boneless duck breasts
3 teaspoons coarsely ground black pepper
4 shallots, minced
1/4 cup crème de Cassis
1/2 cup black currant jam (unsweetened if possible),
1/4 cup balsamic vinegar

Procedure
Preheat oven to 350 degrees F. Place the duck skin-side-up. Using a sharp knife, cut diagonal slits across the skin at a 45 degree angle. Sprinkle 1/4 teaspoon salt and 1/4 teaspoon pepper over the meat side of each duck breast.

Heat a well-seasoned skillet or nonstick pan over high heat. When pan is hot, add duck breasts, skin side down, and cook for 5 minutes, or until skin is brown and crispy. Flip and cook for 2 more minutes. Remove pan from heat (save the drippings) and transfer duck breasts, skin side up, to a cooking sheet lined with aluminum foil. Bake on the top rack of the oven for 6 minutes.
Carefully discard all but 2 tablespoons of duck drippings from the pan. Return pan to medium heat and add shallots. Stir occasionally for 3 minutes, or until shallots begin to turn golden. Add Cassis to the pan and stir with a wooden spoon to loosen up the browned bits left by the duck. Add jam, vinegar, and remaining teaspoon of black pepper, and stir occasionally for 3 minutes. Remove from heat. Remove duck from the oven and slice each breast at a 45 degree angle into 1/4-inch-thick strips (properly cooked duck should resemble medium-rare steak). Arrange in a fanlike pattern on a warmed plates and spoon Cassis compote overtop. Serve immediately. Call me!

Cassis Ice cream

Ingredients
2 cups half-and-half
1/3 cup red currant glaze
3 egg yolks
1/4 cup honey
1/3 cup Cassis liqueur
1 1/2 cups heavy cream

Procedure
Scald the half-and-half in a saucepan. Add currant glaze and stir over medium heat until glaze is dissolved. In a medium-size bowl, beat egg yolks until light and fluffy. Gradually add honey and beat until thick and smooth. Slowly pour the hot cream mixture into the egg mixture, stirring with a whisk. Beat until well blended. Return mixture to saucepan, place over medium heat, stirring constantly until thick and smooth (about 5 to 7 minutes). Cool, and then chill in a freezer for about 10 minutes.

Stir in Cassis and refrigerate until cold. Whip cream and fold into the mixture. Pour into container of ice cream freezer and process until thick and smooth. Spoon into tightly covered container and put into deep freeze to harden.

Saturday, July 11, 2009

Kabob-O-Rama

Seasonal Recipe of the Week
Kabobs are so much fun to make and eat. You can really skewer anything, but you want to be conscious of cooking time so it all finishes at the same time. So sometimes you might want to precook some of the vegetables to make it work better. Here are two great kabob recipes which make great party food.

Cherry Tomato, Ham, and Pineapple Kabobs

Ingredients
1 tablespoon vegetable oil
1 tablespoon white balsamic vinegar
1 teaspoon Coleman’s mustard powder
1 tablespoon honey
1 lb cubed nice ham
1 lb pineapple chunks
12 cherry tomatoes

Procedure
Place oil, vinegar, mustard powder, and honey in a bowl and stir 'til well combined. Thread the ham, pineapple and tomato onto skewers. Brush them with marinade. Cook skewers over BBQ for about 10 minutes, turning frequently and baste with extra marinade. Serve over rice and a festive salad. This recipe serves 4.

Tuna Tarragon and Portobello Mushroom Kabobs

Ingredients
10 ounces fresh tuna
1 lb Portobello mushrooms cut into quarters
2 tablespoons fresh chopped tarragon leaves
2 tablespoons white wine
3 tablespoons balsamic vinegar
1 tablespoon extra virgin olive oil
1 clove garlic chopped
salt and pepper to taste

Procedure
To make marinade, combine wine, tarragon, vinegar, oil, and garlic in large bowl and stir to combine. Cut tuna into 1 inch cubes. Thread tuna and mushrooms onto skewers. Put them into marinade, turn to coat and refrigerate, covered in marinade for at least 30 minutes. Grill on BBQ for about 10 minutes, and continue to baste, turning often. Serve with a nice green bean salad and a slice of lemon.

Saturday, May 30, 2009

Black Garlic with Scallops

Seasonal Recipe of the Week
I found this recipe and had to try it. Produced in Korea and California, black garlic is the “it” food of the moment and it's amazing. I bought some of this new wonder food from my local gourmet food purveyor, but you can also find it on the Internet. Frankly I love eating the cloves all by themselves. It’s sweet and creamy and supposedly has amazing health benefits, but I really can’t vouch for that. You know, just because it's on the Internet does not mean it's true! Even if you don’t have black garlic, this is a simple recipe for scallops. Just substitute the black garlic with regular garlic. But keep in mind that it will be way sharper in flavor and scent and could eliminate the possibility of getting lucky later in the evening.

Ingredients
3 tablespoons butter, divided
16 extra-large dry-packed scallops, diver scallops, patted very dry (about 1 1/2 pounds)
Salt and freshly ground black pepper
3 cloves black garlic, thinly sliced
1-2 teaspoons finely minced jalapeño pepper
1/2 cup white wine
2 teaspoons good balsamic vinegar
2 tablespoons chopped fresh parsley

Procedure
Heat a large frying pan with 2 tablespoons of the butter over high heat. Season the scallops with salt and pepper, and when the butter is bubbling, gently lay the scallops in the pan, not touching. Sear the scallops and cook for 4 minutes, turning once. They should have a lovely golden brown color on both sides. Transfer to a platter.

To the same hot pan on high heat, add the remaining 1 tablespoon of butter. Add the garlic slices and the jalapeño pepper and fry until fragrant, about 30 seconds. Pour in the white wine and the balsamic vinegar into the pan. Let simmer for 1 minute, season with salt and pepper and add the fresh parsley. Pour over scallops.
Serves 4.

Saturday, December 16, 2006

Chickpea Fries with Mock Pomegranate Salsa

Seasonal Recipe of the Week
This is one of my new favorite hors d'oeuvres and it's so darn easy! I first tried it at Graze by Jennifer James in Nob Hill in Albuquerque. She serves it with a trio of salsas, but it can also go with plain old ketchup. You can prepare it ahead of time and fry them as needed. The salsa is a little clever cheat I came up with when I could not get pomegranate seeds, but it works.

Ingredients
2 cups water
1 1/2 tablespoons kosher salt
1 1/2 teaspoons black pepper
1/4 cup extra virgin olive oil
1 1/2 cups chick pea flour
oil for deep frying
1 cup dried cranberries
1/2 cup pomegranate balsamic vinegar
1/2 cup anisette
2 cups any generic tomato-based salsa
1 pinch fennel pollen

Procedure
Prepare a baking sheet with a piece of parchment and lightly spray with non stick coating. Put the water, salt, pepper and olive oil in a saucepan and bring to a simmer. Slowly whisk in the chick pea flour and stir till the mixture is smooth. With a spatula, spread mixture into a smooth, even layer on the sheet pan. Cover with parchment and smooth a little more — this makes it easier! Then refrigerate for 30 minutes. When cool, cut into any shape you would like. I like thin matchsticks. Heat about 2 inches of oil in a frying pan to 375 degrees. Fry a few at a time and serve warm with salsa. Sometimes if I want them to get a bit more of a crust, I lightly coat them in seasoned flour before frying.

To make the salsa, combine the cranberries, pomegranate balsamic vinegar, and anisette in a sauce pan and bring to a boil. Then shut off flame and let sit for 15 minutes. Put that mixture into food processor and pulse a few times. Then add salsa and mix a bit more. If you have this great crazy ingredient called "Fennel Pollen," add a pinch at the end — if not, forget about it.

Saturday, November 04, 2006

Fresh Fig Tart

The Altitude Adjustment Section
My favorite high altitude cookbook — which, as you all know, is Susan Purdy’s Pie in the Sky (see link over there on the left under "Stacy's Cookbook Corner"), — has a recipe in it for Fresh Fig tart that has the beginning of November written all over it. While in NYC last week, I bought some of the most perfect figs I have ever tasted, and what did I do with them? I dipped them in dark chocolate and ate them. It was divine. But here is another option with a fantastic no-roll pastry everybody will love!

Ingredients for crust
2 1/4 cups A.P. flour
1 teaspoon granulated sugar
1 teaspoon salt
2/3 cup canola oil
3 to 4 tablespoons milk as needed

Ingredients for filling
2 cups Mascarpone
1/4 cup honey
1 tablespoon fresh lemon juice
2 pounds fresh ripe figs

Ingredients for glaze
2 tablespoons honey
2/3 cup currant jelly
1 tablespoon balsamic vinegar

Procedure
In medium bowl toss together flour, sugar, and salt. Add the oil and milk, and stir with a fork or your fingertips till it clumps together. If too dry, sprinkle in a bit more milk. Now just pick this mess up and press into the bottom of your 11 inch tart pan, which you have lightly sprayed with non-stick pan coating or lightly buttered. If it sticks to your finger,s cover it with plastic wrap and work it through the wrap, then remove. Now cut a 12-inch square of foil and spread with a little butter. Set greased side down on the pastry, fill shell with pie weights, and bake for 15-17 minutes in a preheated 425 oven. Then carefully remove the pie weights and lower oven to 350 and bake 12-14 minutes more. Let shell cool before filling.

To make filling, beat together everything but the figs and spread in the tart shell. Cut figs crosswise and lay flat on the filling. Now make a glaze! To make the glaze, just combine these 3 lovely ingredients in a small sauce pan till liquid and carefully spread over the figs. Refrigerate till ready to serve. Top with fresh thyme leaves. Oh La La!